


Learning Python for SEO part #2
In part one of this “Learning Python for SEO” guide, we introduced some of core concepts of programming. In this part, we will get our hands dirty, and start to program proper Python!
This is part two of a multipart series “Learn Python For SEO“:
Contents: “Learn Python For SEO” is an overview of the course.
Part 1: “Thinking in Algorithms and Writing Pseudocode”, Introduces the fundamental programming concepts you will need to get the most out of practical exercises later.
Part 2: “Python – A practical introduction” (this article) gives a hands-on guide to Python using an online Python Interpreter – no complex software installation required.
Part 3: “Python – Install Python and Download Your First Website” moves to using a local IDE leveraging Python to download webpages en masse.
Further parts pending…
It’s worth a recap of part one before we start – a lot of the knowledge will come in handy. We will build on the definitions of variables, loops, expressing decisions, and the ability to define functions, as discussed in part one. Python has similarities and differences from the pseudocode we discussed in part one. I hope you will find some conceptual similarities between the pseudocode introduced last time, and the Python programming language.
At this point, some guides will ask you to download Python. We are going to take a different approach.
Learning a new programming language can be a challenge, so we have tried to remove the uncessary hassle of installing Python, so you can focus on the most important part of programming – the language itself.
For this introduction you are encouraged to try an internet based solution to run Python code – meaning no software installation hassle.
Web based Python interpreters.
Python runs in many places. Python is available for Windows, Mac, Linux, can be found on the desktop and in the cloud. There is even a version of Python called micro python which is designed to be run on tiny embedded devices.
This huge range of installation options can add an overhead to online tutorials with beginners having to find the appropriate download and face install hassles. We didn’t want to give you that sort of negative experience.
For this session, you will be introduced to an alternative way of running Python – web based Python interpreters which can be used to run Python code via a web browser.
A few web based python interpreters exist – a couple we found while researching for this article are “repl.it” and “onlinegdb.com”. Both appear to work on a similar principle, albeit with a slightly different screen layout.
We’ll introduce both Repl.it and onlinegdb.com below – have a read of both and then choose which platform suits your needs best.
Repl.it
Repl.it offer a number of languages, coupled with the ability to store and share code across a team. This power introduces a little complexity to jump over at first, though fortunately, much of the complexity can be avoided after these initial steps!
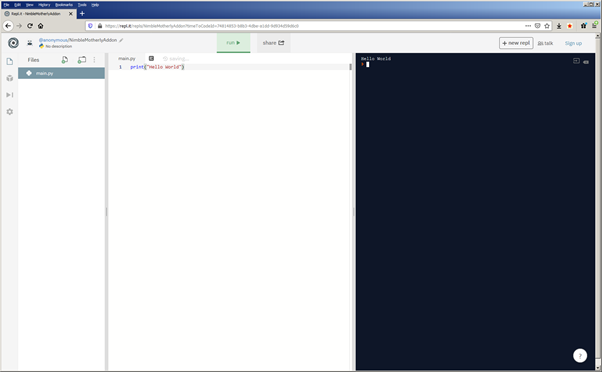
Once activated, Repl.it provides a web screen broken down into 3 panels. If you choose to use Repl.it to follow this tutorial, you’ll be using the middle and right hand windows. The middle window lets you enter short python programs, and the right hand window shows you what happens when they run.
You can start a Python Session by visiting repl.it and:
- Select “new repl”
- Choose Python
- Click Create new
- Bypass Repl setup
Select “new repl”
At the time of writing, The new “repl button” is in the top right hand side of the screen. There is no need to “Log In” or “Sign Up” to access a repl.

Choose Python
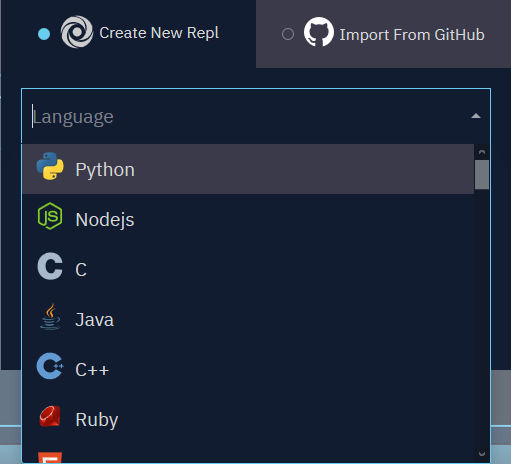
Next, “Repl.it” offers the choice between creating a new Repl, or importing one. Repl.it also presents a list of languages you can choose from. For this tutorial, choose “Python” from the “Create New Repl” tab.
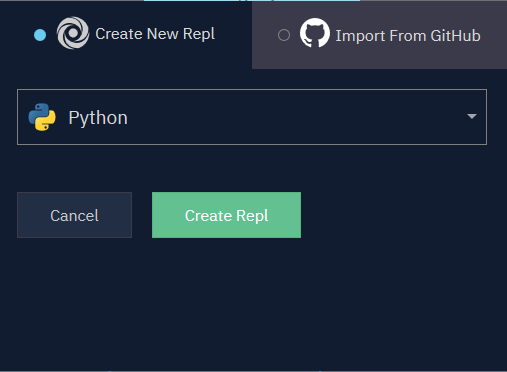
We then confirm the creation of a new “Python” Repl using the green “Create Repl” button.
Bypass Repl setup
Repl.it then presents you with the ability to set up the name and a description for your session. Don’t worry about that now! For the purposes of this tutorial, you can bypass this menu by clicking the mouse outside of the menu pop-up.
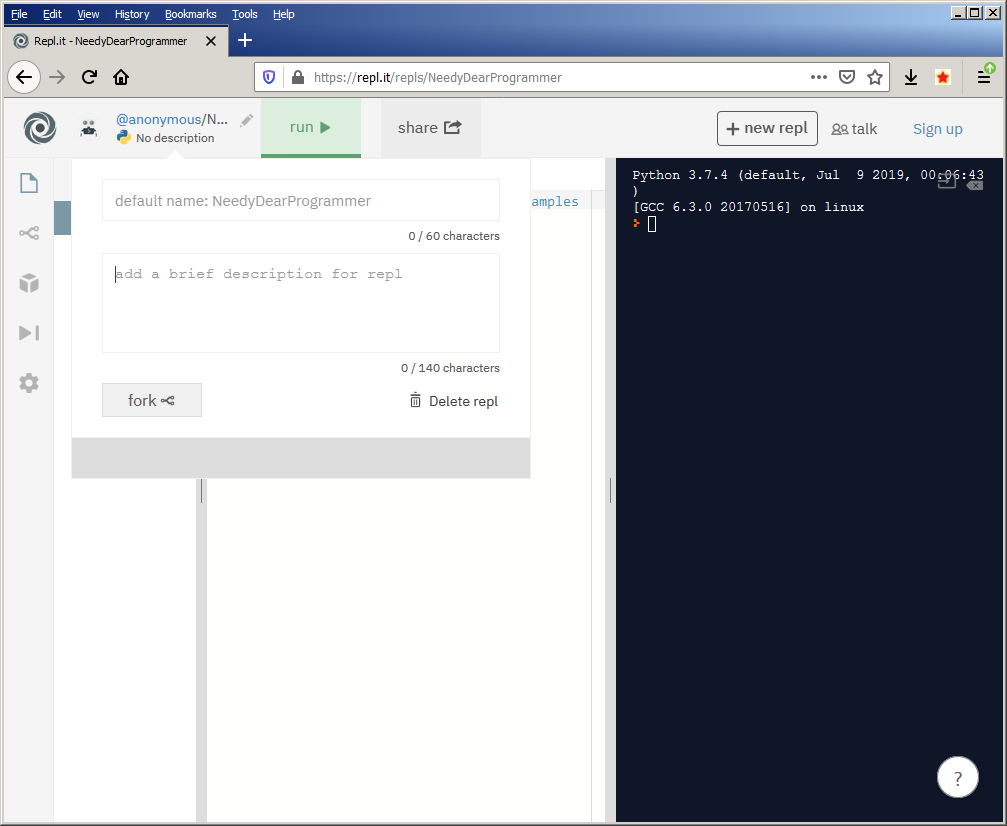
And that’s it – you should now have access to your own online python interpreter!
OnlineGDB.com
You will need the more advanced features included in Repl.it to complete this guide – however, if the steps above seem just a little technical – you may wish to start with something simpler.
OnlineGDB is a little more accessible than Repl.it – to get started, all you need to do is visit the online python debugger page to begin:
https://www.onlinegdb.com/online_python_debugger
Please note: If you choose this option, you may have to switch to repl.it to finish this tutorial, as repl.it supports some of the more complex features used later on.
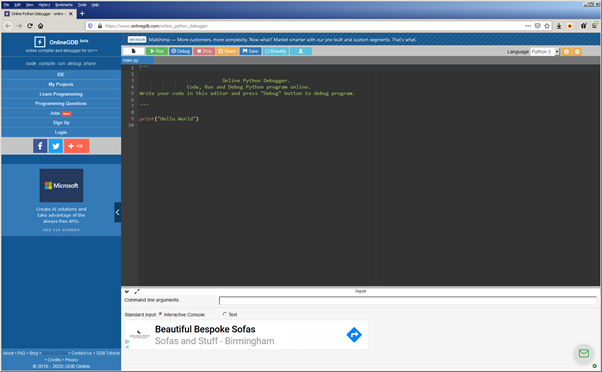
OnlineGDB comes with an example “Hello World” program you can run using the “Run” button. You may also note that Online GDB does come with a few embedded adverts.
Moving from Pseudocode to Python code.
In part one of this guide – we focused on pseudo code – trying to communicate algorithms in a structured, consistent language of our choosing.
Programming languages are a lot like the pseudocode in part one – with one very important exception. In pseudocode, we express each step using a language of our choosing. If you want to program in Python, you have to follow the rules defined by Python. Programming languages specify rules for naming variables, functions, and offer a number of “commands” which are used to tell the computer what to do in each step of your program.
Last time, we looked at some pseudocode to ask for a users name, and to return a greeting:
Pseudocode to greet a user
Show Message “What is your name?”
name = Input
Show Message “Hello {name}”
The python programming language is similar conceptually to the pseudocode above, but differs in implementation. Lets start by taking one step back from the code above, and instead looking at a simple example – a problem known as “Hello World”, and a common first program in many programming guides. The “Hello World” program prints the message “Hello World” to the screen. In Python, “Hello World” is expressed as follows:
print (“Hello World”)
Let’s break that short program down, and see what the structure and punctuation means:
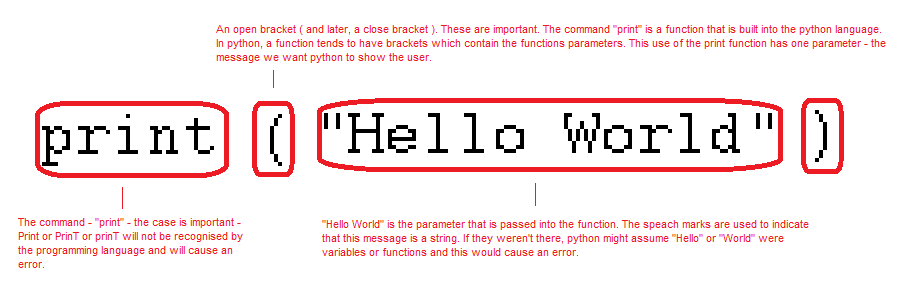
There are three parts to this print command –
- The word
print– a recognised python command. - We then have open and close brackets which contain…
- The phrase
"Hello world"– some characters surrounded by speach marks.
It’s important to know that a lot of programming languages are case-sensitive. Case Sensitivity means that the programming language will consider Print and print as different things. Using Print when you mean print will result in an error message ( try it! ).
The phrase “Hello World” is known as a string – a sequence of text characters surrounded by quotes or speech marks ( depending on what you call the " character ). Within reason, we can change the contents of this string to "Hello Bob", "Hello Sue", or even "Good morning Mr President", with little or no impact on the rest of the program.
We can now use this knowledge, and an online Python interpreter like Online GDB or Repl. At this point, we need to introduce a little of the history of Python, as some online interpreters may use an older version of Python called Python 2. This course will be based on the modern version of Python called Python 3.
A note on Python versions.
Computer programming can be a tricky process, and it’s easy to fall into the trap that anyone who knows how to program well enough to write a computer programming language is a super human genius incapable of making mistake or oversight.
It may be re-assuring to know that people who write computer programming languages tend to be human, need to eat, poo and drink, and learn and develop like the rest of us. As writing programming languages is a skill, it may not surprise you to discover that people who write programming languages get better at their craft, finding new ways to do clever things and coming up improvements to make to the program languages they maintain better.
This progress tends to see new features added to a language. Sometimes, some programming languages evolve so much that they become a little inconsistent. This inconsistency can be frustrating and slow down the practice of programming. In turn, the powers that oversee the language may declare that a whole new version of the language is necessary that fixes the inconsistencies – potentially breaking old programs.
Breaking software isn’t something that’s generally considered to be a good idea. If a programming language requires this level of overhaul, it tends to result in two versions of a programming language. The old version is needed to run old programs. Over time, it is hoped, the old one gets less popular, and more people start to use the new one, and gradually the new language becomes the way to do things.
Python 2 was a tremendously popular programming language, and has seen lots of updates – but some time ago, Python 3 was conceived – a language which would look and feel a lot like Python 2, but introduce a few breaking changes to make the language more consistent and more suitable for modern programming.
The switch has gone on for many years – with Python 3 finally becoming mainstream over it’s older variant. In this guide, we will ignore Python 2 and when we say Python, we will mean “Python 3”.
It’s worth noting that both Python 2 and Python 3 have seen a lot of development, with bug fixes and new features introduced to both languages. What we call Python 3 is actually a range of releases of Python from old ones like Python 3.0.1 to more recent ones like 3.8.1. If you are curious – more detail can be found on the python releases page and python history Wikipedia article.
Our first Python program.
We have already seen our first python program – “Hello World”. Let’s run it using one of the online python interpreters seen above!
If you have set up your session in repl.it, you can enter the Hello World program into the main window ( marked 1 on the image below )

After typing in the print(“Hello World”) program into the main window, you can run the program using the green “run” button ( 2 ). If everything goes to plan, will see the message “Hello World” displayed in the right hand output window ( 3 ).
If you have decided to try OnlineGDB instead of repli.it, the “Hello World” program code is already entered. To run the “Hello World” program, just click on the green run icon in the top menu bar.

When the run button is clicked, the screen changes slightly, and a new panel appears at the bottom of the screen.
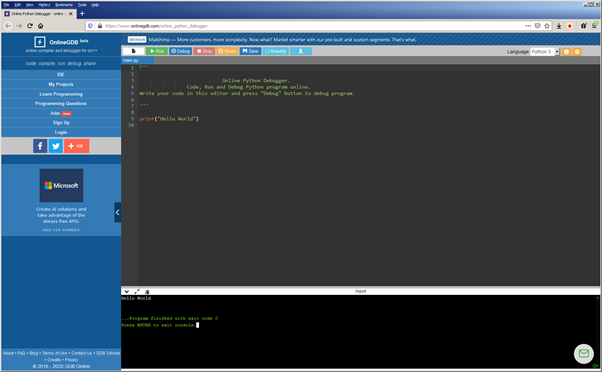
You should see the message “Hello World” inside this new panel, coupled with some technical messaging.
If you see the same “Hello World” message as the screenshots above – congratulations – your program works!
What if the program doesn’t work?
A lot of guides work on the basis that the above code works – which is great unless your program fails to run, and instead of a nice “Hello World” greeting, we instead get a message complaining that something is wrong. Even if your program ran first time, given the amount of time programmers spend “debugging” code, it can be worth putting some errors in deliberately to get a feel for what happens when things go wrong! Here are a few common ones you may wish to trying ( taken from Repl.it ):
Case Sensitivity: Print("Hello World")
Traceback (most recent call last):
   File "main.py", line 1, in
     Print("Hello World")
 NameError: name 'Print' is not defined
You may see the error name 'Print' is not defined is produced if the command print is misspelt, or contains uppercase letters. Python is case-sensitive so if we want to print we should use the lower case print command.
Wrong Quotes: Print (“hello world”)
Traceback (most recent call last):File "main.py", line 1
Print (“hello world”)
^
SyntaxError: invalid character in identifier
This error is more subtle – the quotes that python ( and many other languages ) use are different to the quotes produced by Microsoft Word. If you cut and paste code into or from Word, this can introduce errors like the one shown above.
Missing Quotes: print (hello world)
File "main.py", line 1
     print (hello world)
                  ^
 SyntaxError: invalid syntax
Error messages are not the nicest of events at the best of times – especially when Python gets a little confused and reports a different error to the one you expect – in this case, pointing to the start of the word “world” as a suggested starting point. The issue we want to fix in this example are the missing quotes, but Python points elsewhere!
A varient on Missing Quotes: print (hello)
Traceback (most recent call last):
   File "main.py", line 1, in
     print (hello)
 NameError: name 'hello' is not defined
If the space is ommitted and quotes are missing you will see a slightly different error message. This is because the print command expects a variable called name to have been set up first. Python doesn’t check your code for all possible errors at the same time. Instead, Python prioritises error reporting, and yells as soon as it see’s something wrong. This is why the message above in the first “Missing Quotes” example points to world. Python has prioritised checking for a different error, as it expects hello to be a valid, defined, variable. Python hasn’t checked the validity of the variable yet, as the presence of a different word in the print command which no sense to it what-so-ever.
Getting User Input
Let’s return to the greeting pseudocode we re-introduced from part one of this guide:
Show Message “What is your name?”
name = Input
Show Message “Hello {name}”
You may already be able to adapt the Hello World program to display the first question above:
print("What is your name?")
The print command can be used to display more than just a “Hello World” string ( a message is called a “string” in programming terms ), so we can adapt it to ask the question instead. However – we can improve on our pseudocode, as Python has a clever input command which accepts a string parameter, and displays the string before taking user input.
You can represent the first two lines of the pseudocode above in the following single line of Python ( try to run it in your Repl.it or OnlineGDB.com session – you can either delete the existing code or add this on at the end ):
name = input("What is your name? ")
You may still see some similarity to the pseudocode – a variable called name is introduced, and the user is prompted with the message “What is your name?”. The input command will assign the value entered by the user into the name variable using the “assignment operator” – in programming terms, the equals sign: = .
The assignment operator works by trying to calculate what is on the right of it. After working this calculation out, it then tries to put the result of the calculation into the variable on the left of the assigment operator.
If you decided to enter the name = input("What is your name? ") program into your online interpreter, you may have noticed that not a great deal happend in order to print out the name. To do this, we need to introduce a twist on the print command which lets us put variables into strings:
print ("Hello {}".format(name))
If you put both lines of code into Repl or onlineGDB in the following order, you can try the program out, and, hopefully, be greeted on a more personal basis by your computer –
name = input("What is your name? ")
print ("Hello {}".format(name))
We will return to an explanation of “Hello {}”.format(greeting) later in this article when we look at a new concept called methods. Before we look at methods, it may be beneficial to look at how we can define our own functions.
Functions
A feature we introduced in part one of the course was functions – a way of structuring programs better and potentially reducing the amount of code our programs need to achieve a task.
Because Functions are such a common language feature, Python makes them very easy to define:
def greet(greetee):print("Hello {}".format(greetee))greet("Bob")greet("Sue")greet("World")
If you enter this code into your interpreter and run it, you should see the following in your output window:
Hello Bob
Hello Sue
Hello World
It’s worth noting that calling the greet function and passing parameters looks a lot like the print command. You may find it helpful to think of Python commands as inbuilt functions.
In order to create your own function, the def command is used, followed by the name you want to call the function ( in this case greet ). Your function can take one or more parameters, the names of which are listed in brackets:
def greet_chef(forename,surname):print("Hello Chef {} {}".format(forename,surname))greet_chef("Huan","Cook")
After the parameters for the function, there is a colon. The colon indicates the start of the function definition – the commands which will be called when your function is called.
In Python – the function definition is indented with whitespace. This is different to many other languages which use brackets or other punctuation to define function blocks. Python’s use of whitespace could be considered an improvement, as programmers in these other languages tend to indent code blocks with whitespace on top of any use of brackets.
Function definitions can contain many commands – to finish, you just stop indenting the code when you have finished your function definition. You can try a multi-line function by introducing a couple more lines to your greet function:
def greet(greetee):print("--------------------------")print("Hello {}".format(greetee))print("--------------------------")greet("Bob")greet("Sue")greet("World")
If you run this program, you should see slightly more verbose content, with a leading and following line of dashes around each greeting.
Decisions ( The “IF” statement )
In programming, it is very common to try to control the flow of a program using a test to see if some condition has been met. There are a range of tests which can be applied – comparing numbers to see if they are equal, or if one is greater than the other, comparing strings to see if they are the same, or if one string contains another. You may want to compare dates to see if they correspond to the same day of the week.
Fundamentally, all these tests boil down to a simple true or false test.
If statements let the programmer perform potentially complex sets of operations, that reduce down to a true or false condition. If the condition is true, then the block of code following the if statement is executed. If the condition is false, then the block will not be executed.
Consider the following example code – what do you think will happen when it is run?
test = 7
if ( test > 6 ):
   print ("The test number ( {} ) is greater than 6".format(test))
Hopefully, you see confirmation that 7 is greater than 6! A default fallback is provided by using the else command in conjunction with the if statement, which you can try below:
test = 5
if ( test > 6 ):
   print ("test is greater than 6")
else:
   print ("test is not greater than 6")
It’s not just numbers that can be tested – you can also test strings for a number of different conditions. A common testing condition is to see if a value of a string matches some predetermined value:
test = "plant"
if ( test == "fish" ):
   print ("test is a fish")
else:
   print ("test is not a fish")
It’s worth noting that the test to see if strings ( or numbers ) are the same is ==. You may be wondering why instead == of = ? This is because = has already been used as the assignment operator in Python.
Python provides you with a huge range of inbuilt tests which you can use on a variety of data types. So far, we have seen numbers and strings. There is also a different data type – a list, which gives you the ability to handle lists of strings in Python:
names = ["bob","sue","rita","world"]
A useful test that can be used on these lists is in to see if a list contains a particular entry – such as this security person simulator you can enter into your interpreter:
names = ["bob","sue","rita","world"]

if ( "ralph" in names ):
   print ("ralph can come in")
else:
   print ("ralph cannot come in")

if ( "bob" in names ):
   print ("bob can come in")
else:
   print ("bob cannot come in")
There are many more cases in which you can use loops, and huge numbers of examples are available in google. For now, though, let’s move onto the next topic – how to run a command many times.
Loops / Repetition
There are a few ways of expressing loops in Python – many look a little like a function definition – begining with the for command, and ending with a colon.
Typically, there will be some manner of variable in a loop that can change each time the loop is run. This variable can be used to test to see if the loop should stop running, or simply count up through a sequence of numbers.
A technique to count numbers is to use the range command to produce a range of numbers that are stepped though – though beware! There is a trap for the unwary. Running the following may not give you what you expect!
for counter in range(10):
   print(counter)
This produces:
0
1
2
3
4
5
6
7
8
9
Ten numbers are produced – zero through nine inclusive – but ten is not listed. This is because many computer programming languages treat sequences of numbers as starting at zero. This leads to the potentially odd situation where zero is the first item, one is the second, and so on.
If you want to count from one to ten, there are a couple of techniques which may be helpful – though the most straight forward is to just add one to the counter before you print it:
 for counter in range(10) :
   print(counter+1)
Produces:
1
2
3
4
5
6
7
8
9
10
The second type of loop is called a while loop, and continues until a variable reaches a certain condition. This sort of loop is great for testing user input – such as in the following code:
name = ""while ( name != "Rumplestiltskin" ):print("Guess my name, Guess my name!")name = input()print ("Well done, you guessed my name!")
If you copy and paste ( or type in ) the above code into your online interpreter, and run it, you should have a basic game, whereby the user must guess the name of some mystery character played by the computer. The game ends when the user types “Rumplestiltskin” or the “stop” button is pressed in the online Python interpreter. Try changing the name, or using a parameter for input instead of the seperate print statement above.
The game works because when the user guesses correctly, the loop exits, as the condition in the while statement becomes untrue. The interpreter then moves onto the next available line of code and displays the success message congratulating the user.
The format of these blocks of code that power if statements and for and while loops may look similar. This consistency helps a programmer adapt to a language and express problems clearly and quickly.
We have covered a great deal of material so far – including functions, loops, conditions and various tests we can apply to strings, numbers and even one for a list. Let’s have a quick recap before we move onto the explanation of "Hello {}".format("world") promised earlier.
Summary of commands and tests
Well done for making it this far! Lets pause to recap on some of the Python we have been introduced to before we continue:
print("Some Message")shows a messagevar = input()captures user input and puts it into variable varvar = input("enter some input:")as above, but displays a message to the userprint("A {} is inserted into this message".format("string"))includes a variable in a message shown to the user.if ( x > 6 ):If variablexis greater than6, execute the block of code following the colon.else:Follows anifstatement.posessions = ["house","car","shed"]a list containing three stringsfor i in range(5):Executes the following code block 5 times, counting i from 0 to 4while ( name != "Rumplestiltskin" ):Executes the code block which follows until the variable name contains the string “Rumplestiltskin”name = "bob"assignement ( makes the variable name contain the string “bob” )-
name == "bob"tests for equality ( tests to see if variable name contains the string “bob” ) "boat" in posessionstests for a presence of a string “boat” in the listsposessions
If you haven’t taken a breather or cup/glass of your beverage of choice, it may be worth doing so now, and scanning over the material above before we continue to look at methods. After looking at methods, We will finish off this post with some example code to set the scence for some content to come later in this series.
An introduction to methods
Earlier, when you wrote some code which included a value from the user in our output, you used a new form of function which we introduced as a method. We used the format method with a string to include user input in the messages shown on screen. Our code was in the form:"Hello {}".format("world") – which you can revisit by clearing down your online intepreter and re-entering the code below:
print( "Hello {}".format("world") ) Earlier, we introduced print as a function, but then said that format was a method – so what’s the difference between a function and a method? And why are two different ways of doing a task needed in a programming language?
A way of looking at the difference between methods and functions is to think of a method as a special type of function that acts on something. In this case – the format method is called on a string – "Hello {}". format( ... ). The dot between "Hello {}" and format ( ... ) is the symbol in Python that means “call the following method on this thing”.
When the Hello {}".format("world") code is run, the computer will call the format method on the "Hello {}" string before it does what is needed to perform the print function. So in this case, the format method reads through the first string, and produces a new string containing the old string, with the curly braces {} replaced with the argument passed into format. This new string is passed into the print() function, and we get our nicely formatted output.
It’s worth trying to ignore the format method call, and just print the initial string containing the curly braces – like this: print( "Hello {}" ) – the functionality provided by the format method is not present – so your print statement will just does it’s core function – printing. If you try it then you should see a message like the following:
Hello {}
It’s important to note that for the most part – the methods you call on things are very context dependent. You can call format on strings, but will run into difficulty if you try to call format on a thing that doesn’t have a format method available – like a number. You can test this by trying some deliberately bad code like print (12.format("world")) – which produces the following error when run in Repl.it:
File "main.py", line 1
     print (12.format("world"))
               ^
 SyntaxError: invalid syntax
There are other methods available for things that are Strings which you can try using print:
print("I AM NOT SHOUTING".swapcase())print("this is shouting".swapcase())print("This Is All Uppercase".upper())print("This Is All Lowercase".lower())print("This Just Swaps Upper & Lowercase Characters".swapcase())print(" this has no padding ".strip())print("---this has no dashes padding it---".strip("-"))print("---neither - does - this ---".strip("-"))print("i want this to be a title".title()) print("...NOt WHackY TyPiNG...".strip(".").lower().capitalize())
If you copy and paste the whole block, you should be rewarded with a demo of a number of methods available for things that are strings:
i am not shouting
THIS IS SHOUTING
THIS IS ALL UPPERCASE
this is all lowercase
tHIS jUST sWAPS uPPER & lOWERCASE cHARACTORS
this has no padding
this has no dashes padding it
neither - does - this
I Want This To Be A Title
Not whacky typing
Most of the examples above follow a simple pattern – a method is called on a string. Some methods have taken a parameter – others have not.
The last example “Not whacky typing” is a little more complex than the others. This example chains together methods. Method chaining is a popular programming technique because it leads to shorter code. However – it is full of traps for the unwary.
The “Not whacky typing” example only works because each of the carefully chosen methods returns a string. Because a string is returned, we are able to call another string method using the dot notation. It is only because our string methods return strings that we are able to string together a sequece of string methods.
Not all methods return strings – and that applies to methods you can call on strings too – lets have a look at a different method that returns a number:
print ("We should ban bendy bananas!".count("ban"))This should print 2. If we try to chain a string method to this then the code will generate an error – because count() returns a number, and upper() is a method that applies to strings rather than numbers:
print ("We should ban bendy bananas!".count("ban").upper())
Traceback (most recent call last):
  File "main.py", line 2, in
    print ("We should ban bendy bananas!".count("ban").upper())
AttributeError: 'int' object has no attribute 'upper'
So many methods – Don’t Panic!
One important note on methods – the important take home here is concept of a method – not the range of methods available. Please – pretty please, don’t feel you need to learn these methods. Programmers tend to learn the methods they use most almost by accident due to frequency of use. For less memorable methods – developers tend to use a search engine like Google/Bing or instead search on a dedicated technical Q&A site like StackOverflow. There is, of course, also online documentation and a range of books to choose from including the Python cookbook by David Beazely and Brian K. Jones .
Building up to more real code.
We’ve now looked at many of the fundamental building blocks of code introduced in part one of this series, and gone further to explore methods. Before we close – let’s finish up with a slightly more complex example – parsing a web page to find some key features.
While many of the examples above run in both OnlineGDB and Repl.it – we will use the more complex features supported by Repl.it for this example.
Rather than generating unnecessary web traffic for the purpose of a demo – we can start this example with a “heredoc” – a way of populating a string with more complex data than can easily fit inside quotes.
It’s very easy to create a heredoc in Python – just use three quotes next to eachother rather than one, as can be seen in the following code which puts a small html page into the html variable and then prints it out.
html = """<html>
<head>
<title>This is a webpage</title>
</head>
<body>
<h1>A header</h1>
<p>Some Text</p>
<h2>first level two header</h2>
<p>another paragraph this one containing a link to <a href="https://google.com">google</a></p>
<h2>second level two header</h2>
<h2>third level two header</h2>
<p>a footer containing a link to <a href="https://example.com">example.com</a></p></body></html>"""

print(html)
Running this code should print out the raw HTML sourcecode for our sample page. By using """ and """, rather than " and " to wrap our string, we get to use multiple lines of data and include quotes.
Now we have a webpage in the computer memory, we need a way to process it. One idea could be to write some code to understand HTML and pull out some features. But – we don’t need to do such unecessary hard work.
One of the huge benefits of modern programming languages like Python is the huge open source community. In a delightfully de-centralised way, members of the community have created a plethora of software building blocks. These can be re-used to build new programs ( within licensed terms ). Re-usable code in this form tend to be called packages, libraries or modules. There are some subtle differences between packages and modules which are out of the scope for this series, but the terms are sometimes used interchangably.
One of the many Python packages out there to process HTML is BeautifulSoup4. It should be noted that the author makes a plea for ethical use of the software. BeautifulSoup4 is the latest version of beautiful soup, and is available with commercial support from TideLift. BeautifulSoup4 can be imported into Repl.it using the inbuilt package manager as follows:
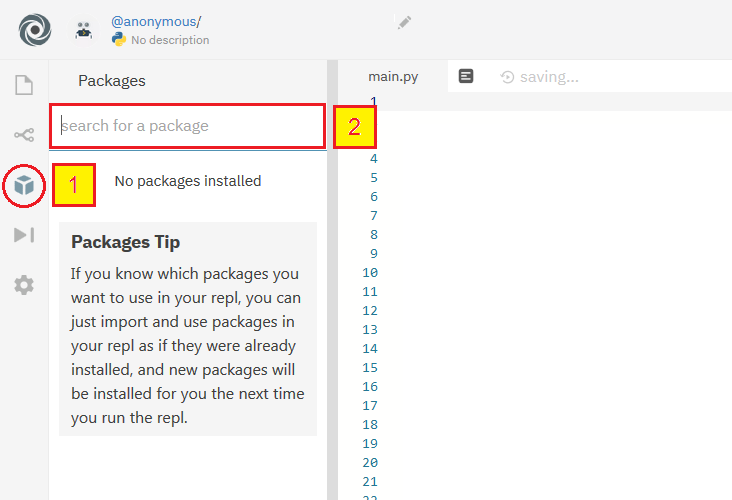
First – select the package manager ( box icon ) from the left hand menu bar[1]. Then enter “beautifulsoup4” into the package search[2].
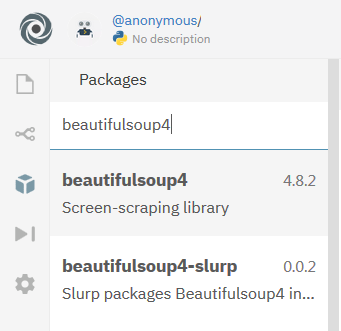
We need to select “beautifulsoup4 Screen-scraping library” – the above version is 4.8.2 – which is correct at time of typing. The version number may have moved on since.
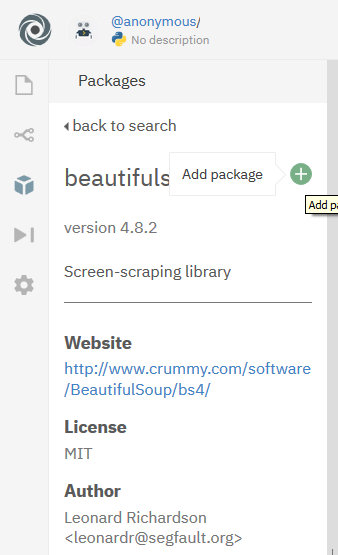
We then click the green plus button to confirm we wish to Add the Package to our project. This will yield some text along the lines of the following in the output window:
Repl.it: Updating package configuration
 --> /usr/local/bin/python3 -m poetry add beautifulsoup4
 Using version ^4.8 for beautifulsoup4
 Updating dependencies
 Resolving dependencies…
 Writing lock file
 Package operations: 2 installs, 0 updates, 0 removals
 Installing soupsieve (2.0)
 Installing beautifulsoup4 (4.8.2)
We can now look at using BeautifulSoup to examine our test html page.
Because BeautifulSoup is a third party package rather than a standard part of Python, we need to explicitally tell our program that we want to use it. The package manager has a different role to helping our program tell Python what libraries it needs. Python has a command called import that lets us tell Python we want to use the library. Fortunately, the libraries documentation tends to tell us how to import the features we need. In the case of the documentation for BeautifulSoup, they suggest the following to import the module:
from bs4 import BeautifulSoup
soup = BeautifulSoup(html, 'html.parser')
This code tells python we want to use the BeautifulSoup module and then proceeds to create a usable “soup” object from our html. An object is a thing which you can call methods on – a little like our string examples above.
You may have noticed the presence of single quotes rather than double quotes in the example above, surrounding html.parser. Python lets you use single or double quotes pretty much interchangably – as long as you open and close with the same quote charater. This feature can be really handy when you want to make a string that contains a quote charactor – such as " this contains a single quote -> ' <- here " or " this contains a double quote -> ' <- here ". You may find that some programmers prefer one form of quote over the other – which can lead to some examples of code using single quotes and others using double.
BeautifulSoup objects have a huge range of methods available. For the purpose of this introduction – let’s have a look at extracting a small number of basic features from our html page –
- The page title,
- The target and anchor text of any links on the page,
- and H2 tags.
The documentation can be pretty daunting for first time readers, but it contains detail of the methods we can call on a “soup thing” to get the data above. We also need to introduce a new concept – attributes. I don’t want to add too much complexity, so for now – lets brush over any formal definition. It should be sufficient to think of attributes as similar-ish to methods which return a value – but have no parameters and do not have brackets following them.
- Get the page title:
soup.title.string( this is an attribute ) - Find all links:
links = soup.find_all("a")( find_all is a method. “a” is the html tag for a link. This code therefore returns a list of anchor html tags ) - Find all H2 tags:
headers = soup.find_all("h2")( as above but with “h2” tags )
Python makes processing lists of things in loops really easy, which means we can use some similar code to the loops we looked at above to process each link in the list of links produced by the code links = soup.find_all("a") above:
for link in soup.find_all("a"):
     # process each link
The documentation suggests that we can get the target of a given link tag using link.get("href"). The anchor text is effectively the contents of the link tag – and can be extracted using a similar technique to getting the contents of the title tag shown above – link.string.
for link in soup.find_all("a"):
     print("Target: {}",format(link.get('href')))
     print("Anchor: {}",format(link.string))
Having looked at all the elements, we can put all the code together and try to run it in our repl.it session:
from bs4 import BeautifulSoup

html = """<html>
<head>
<title>This is a webpage</title>
</head>
<body>
<h1>A header</h1>
<p>Some Text</p>
<h2>first level two header</h2>
<p>another paragraph this one containing a link to <a href="https://google.com">google</a></p>
<h2>second level two header</h2>
<h2>third level two header</h2>
<p>a footer containing a link to <a href="https://example.com">example.com</a></p></body></html>"""

soup = BeautifulSoup(html, 'html.parser')

# We have commented out the next line so it will not be run.
# print(html)

print ("The title of the page is '{}'".format( soup.title.string ))

print ("Links on this page:")
for link in soup.find_all('a'):
     print("Target: {}",format(link.get('href')))
     print("Anchor: {}",format(link.string))

print ("H2 tags on this page:")
for header in soup.find_all('h2'):
     print(header.string)
Assuming you’ve succesfully used the package manager to include beautifulsoup4, the program should output the following:
The title of the page is 'This is a webpage'
Links on this page:
Target:  https://google.com
Anchor:  google
Target:  https://example.com
Anchor:  example.com
H2 tags on this page:
first level two header
second level two header
third level two header
Success! We have gone from “Hello World” to processing a basic html file in one session – if you have got this far – congratulations, and welcome to programming!
Wrapping up ( for now )
I hope you’ve enjoyed a pretty substantial practical session to balance the theory of the first part of the “Learn Python for SEO” series.
We introduced repl.it and onlinegdb.com . You’ve seen how online Python interpreters can help us get coding without having to install software on our own PCs.
Building on the first article in this series, we looked at Python equivalents for some of the fundamental building blocks of programming languages. We’ve also introduced a few tests we can perform on variables to control the flow of our programs.
You’ve seen how we can define functions and loops to help us keep our code tidy and perform repetitive tasks.
We then looked into methods which are one of the fundamental constructs of Object Orientated programming .
We’ve wrapped up the session by introducing third party packages – and introduced BeautifulSoup. You should now have code which processes a web page to extract key features.

Steve has been engaged with the Birmingham tech scene for years, co-organising the grassroots open-source conference YAPC:: Europe 2008, and founding the West Midlands Java User Group in 2014.
- Majestic head office – relocation - March 31, 2026
- Introducing Duplicate Link Detection - August 27, 2021
- Python – A practical introduction - February 25, 2020